28 October 2011

NeuSpeeder Detailed Update

Ok, a quick recap of the NeuSpeeder Project; the base idea is automobile scaled armored LandSpeeders  that trade with the walled Fortress Towns of the Post Apocalypse Wastelands. The core trope is CarWars with LandSpeeders. This group is all generally supposed to be car sized. There plans for truck and bus sized speeders as well as SpeederBikes both open and enclosed when I have gotten a firmer handle on the shapes.

Base construction consistes of taking a appropriately sized wad of Magic Sculpt (I get my supply from Tap Plastics as they have several local stores), and applying it to sculpting stand. The stands I am using are just recycled soda bottle caps rescued from the recycling bin. Then I do a rough shaping to said wad with my fingers to get it into an approximately auto-ish shape. I tend to go a little wild in this phase and work up a lot of teardrop or ellipsoid shapes because I can always go back an bulk out shapes that don't cut the grade when the next layer or two is applied. The last step in this phase, and every phase is after the Magic Sculpt cures a liberal sanding with a course grade sponge cored sanding block, this roughs up the surface for the next layers and also allows basic refinement of the core shape. I clean up after sanding by throughly brushing the piece with a stiff-ish brush and a wipe down with a Isopropyl Alcohol saturated paper towel.

The next phase is the bulk out. Here is where the final shape is defined in little steps. Each shape or step is applied with a different color of Magic Sculpt, which gives better contrast than the basic translucent off-white that is the core color of Magic Sculpt. This stage uses more tools than just my fingers, mostly reshaped popsicle sticks. I prefer wood tools as if you let them soak in a jar of water, that way the Magic Sculpt doesn't stick to them, very much. Note, Magic Sculpt thins and softens with the addition of water. so when working with damp tools it is a good idea keep a few paper towels handy. While this phase is about building up to and finalizing the core shape, the detail/surface layer is still to come. Sanding uses more tools beyond the basic corse sponge cored sanding block, I have found cheap emory boards in various grades work well for refinement. Coloring the Magic Sculpt is accomplished by add a little bit of Paste Pigment after the two parts have been throughly mixed. I generally use a little bit of barrier coat on my hands while I am working with the putty. If you have any sensitivity to epoxies gloves are advised. 

This one is done up as a test of concept "Tank Destroyer" / Turret-less tank.


Proto Service Body Pickup.


This one I am thinking just needs detail work.


Micro Bus


Another Tank concept


These are the tools used so far. Shaped Popsicle Sticks and Clay/Color Shapers. 

Sponge cored Sanding blocks in various grades. 

Various colors of paste Pigment. (Gray, Black, Red, Blue, Yellow and Brown, this way I can mix up to nearly any shade) 

General thought at this point in the project are than maybe using another material as the core might be an idea. I am thinking maybe balsa wood, something realativly malleable and fast to put up. The other idea in maybe a composite of puttyies for the outer layers, as a 50/50 mix of Greenstuff and Magic Sculpt has far different handling characteristics than straight Magic Sculpt.


27 October 2011

NeuSpeeder's next Layers

Ok, first off Found Bob! So we have our Scale guy back. 

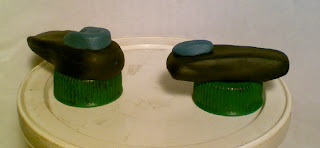
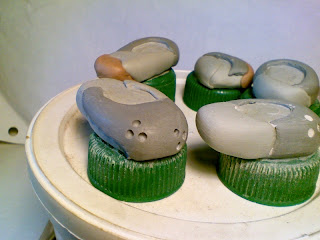
In these two pictures we see two layers and some paste-up with wooden craft rectangles and hot glue. In the top picture you can see complete revision of a core shape of one of these vehicles (the mostly gray one). The bottom picture you can see the addition to the core with the addition of craft shapes with hot glue, I did this give a more angular core shape. I could have done the addition with putty, but the hot glue gun was just sitting there and mixed media seemed like an idea.


I have a bunch of newer work to show off from the last couple of sessions, just have to shoot pictures. I also am pondering the construction of light vehicular weapons. While for these I will probably dig into the bits bin, I have a bunch of old Mech bits kicking around. And have been pondering some the current lines of Mech figures that I can purchase bits for (both Reaper's CAV line and IWM Battletech lines have bits available).

More laters,
Evyn...

17 October 2011

NeuSpeeder Update

Ok, a quick, mostly pictorial update. Here is the some more bulking out of the basic shapes, tonight I was concentration on the passenger areas, making sure there is enough under-volume. The next step is another round of sanding and then some more secondary bulking out in preparation for the detail layers.

The materials so far are Magic Sculpt and paste pigment. Tools are fingers, sandpaper, sponge cored sanding blocks, files, and various Dremel bits, mostly sanding drums.


Oh! Bob has gone walkabout recently, so I need to find a new comparison figure.

14 October 2011

Project NeuSpeeder

Ok, it has been a long while since I posted any thing anywhere, lot of things needed fixing here at Casa MacDude, and I hosted "She Who Must Be Obeyed" for two and half weeks from her lair in Japan. Coupled with the other one telling me that I (he who is the font of kindness and understanding) that "Stressed Her Out" and didn't want to see me any more, this on the eve of the impending arrival from Japan. So recovery from the visit and a general reordering of plans and work space have slowed down this my open correspondence with y'all.

I have several project in various stages of completion hanging around in boxes under the worktables, as I get them going again I shall document progress, tools, and methods. First off the table is a project that has been noodling around in the brainpan for the better part of this year. The idea occurred to me reading one of the background blurbs in the original WarHammer40k:RogueTrader rulebook talking about the "bus gangs" of a mining world, They drove HoverBusses and raced HoverBikes thus an Idea was germinated. Couple that with all the Post Apocalypse goodness I have been working on and you have NeuSpeeder's of the Southern Deserts.

NeuSpeeders are landspeeders as we see in Star Wars, i.e. floating cars, then add a PA vibe to them... So think Car Wars with Landspeeders. (Game details will follow in further blogs)

NeuSpeeder construction, well the models them selves start as kinda Speeder-ish shapes of Magic Sculpt, or at least that is how the first two batches started. 

The 1st step is to mix up a batch of Magic Sculpt optionally adding a little bit of pigment (this part helps in the shaping process if you use different colors for consecutive layers). Basic shaping is done with my primary tools, my fingers, all I am trying is get the basic shape roughed out. The pictures labeled Second Batch are the core blanks I will work up from (I used a little too much black pigment).

The next step is to use corse sandpaper to refine the core shape, and give a good tooth for subsequent layers to adhere to. This layer also can see a lot of work with the the dremel tools and corse files for shaping.

==>Design note; While the LandSpeeder is the inspiration, I am not going to try to replicate the entire jet engine thrust aesthetic. Thrust exhausts will be part of the body, intakes similar if the exist at all. 

Next is the adding the detail layers, as you can see in the 1st Batch pictures I have started on this on these.

The stands the blanks are mounted on are scavenged screw-top soda bottle caps. 

First Batch


Second Batch