Ok, it has been a long while since I posted any thing anywhere, lot of things needed fixing here at Casa MacDude, and I hosted "She Who Must Be Obeyed" for two and half weeks from her lair in Japan. Coupled with the other one telling me that I (he who is the font of kindness and understanding) that "Stressed Her Out" and didn't want to see me any more, this on the eve of the impending arrival from Japan. So recovery from the visit and a general reordering of plans and work space have slowed down this my open correspondence with y'all.
I have several project in various stages of completion hanging around in boxes under the worktables, as I get them going again I shall document progress, tools, and methods. First off the table is a project that has been noodling around in the brainpan for the better part of this year. The idea occurred to me reading one of the background blurbs in the original WarHammer40k:RogueTrader rulebook talking about the "bus gangs" of a mining world, They drove HoverBusses and raced HoverBikes thus an Idea was germinated. Couple that with all the Post Apocalypse goodness I have been working on and you have NeuSpeeder's of the Southern Deserts.
NeuSpeeders are landspeeders as we see in Star Wars, i.e. floating cars, then add a PA vibe to them... So think Car Wars with Landspeeders. (Game details will follow in further blogs)
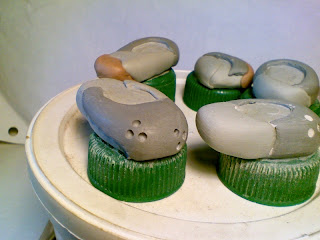
NeuSpeeder construction, well the models them selves start as kinda Speeder-ish shapes of Magic Sculpt, or at least that is how the first two batches started.
The 1st step is to mix up a batch of Magic Sculpt optionally adding a little bit of pigment (this part helps in the shaping process if you use different colors for consecutive layers). Basic shaping is done with my primary tools, my fingers, all I am trying is get the basic shape roughed out. The pictures labeled Second Batch are the core blanks I will work up from (I used a little too much black pigment).
The next step is to use corse sandpaper to refine the core shape, and give a good tooth for subsequent layers to adhere to. This layer also can see a lot of work with the the dremel tools and corse files for shaping.
==>Design note; While the LandSpeeder is the inspiration, I am not going to try to replicate the entire jet engine thrust aesthetic. Thrust exhausts will be part of the body, intakes similar if the exist at all.
Next is the adding the detail layers, as you can see in the 1st Batch pictures I have started on this on these.
The stands the blanks are mounted on are scavenged screw-top soda bottle caps.
First Batch
Second Batch


Hi Evyn, wouldn't it be easier to make one shape, get that exactly how you want, then make a rubber mold and cast the rest in resin? this way you will have blanks that are the same, then add detail to make each one to make them unique.
ReplyDeleteActually that is the background plan once a get a set of shapes I like. This method allows for exploration of technique and idea revolving around a core theme.
ReplyDeleteIn essence these are sketches in 3d form, while I do work from rough cartoons. the idea needs the 3rd dimension to express it.
I have been exploring mold making materials for quick and dirty blanks, it looks like I might play with thermoset vinyl, but I still matching a resin to it. (one that won't take the mold over its set point).
OK, cool, interesting project.
ReplyDeleteThe styrene models tend to be one-offs as I use a lot of other people parts and don't limit my undercuts.
ReplyDeleteI am considering making up some of my own bits then cast them up so I don't have the issue. But everytime I sit down to do a item the rest of the list goes out of my head. So I am slowly building up a list with associated sketchs so I can get the batch done. The other issue is wether to do them all manually or through a cad program.
How hard is CAD to use, I'm a little PC illiterate.
ReplyDeleteCad for organic shapes is somewhat beyond me, for mechanical shapes I am mostly fine.
ReplyDeleteI am pretty much a dinosaur when it comes to cad, all my mechanical drawing was learned at the drafting table, and unfortunately I have found that training doesn't quite cover the requirements of some of the advanced Cad technique.
The Bits issue is more about those standard chunks of vehicles, hatches lights, wheels, etc... etc...
But that is the Joy of the NeuSpeeder project is they are a combination of High Tech and Post Apocalyptic Tech so each model is unique in all it's parts from the point of creation. So if I get one I really like I get to cast it for replication, instead of building another up from parts.
One of the issues I am pondering is materials I love styrene as a material, it allows me to kit-bash for building. Which in turn allows me to build fast while the idea is hot. So ideally I would like my bits to be materially compatible. Which leads me to ponder a hobby level Plastic injector.
OK, starting to get sophisticated with a plastic injector, wonder how much they would set you back, I imagine the molds are the hard part.
ReplyDeleteAnywhere from a couple of hundred bucks to around $2000, depending how much I build myself.
ReplyDeleteAs for the tooling there are several methods, from milling to casting with metal impregnated resin. I am leaning towards the resin myself.
Let me know how you go.
ReplyDelete